Sunday, April 27, 2008

First Impressions

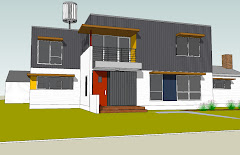
As the old saying goes, “you never have a second chance to make a first impression”. Up until now, we have been concentrating on the big picture- what the house looks like from the street, how it fits into the neighborhood, scale and proportion. But the small details can be equally as important on one’s first impression and deserve some attention as well. We’ve made a couple of choices on some of these smaller details including solar step lights, a mailbox and doorbell,

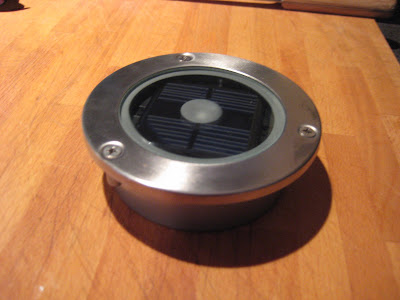
Solar Accent Lights
This Smart Solar product has a solar module in the center that charges the batteries. At dusk, the LED lights automatically come on and turn off at dawn, as long as the batteries are fully charged. I found these solar step lights at Amazon.com. They are about $25 each. I was impressed with the quality of the housing, which is stainless steel ring with glass top. The unit can be inserted into concrete, a wood deck or just placed at the edges of a sidewalk in mulch. I ordered 4 to start with, but I may order more now that I can see they are of good quality. We just have to decide if they will be mounted into our wood front entry deck, or will be alongside the sidewalk.

Mailbox
We have a partial height wall at the side of our front door that will serve as an edge to our entry stairs and as a place for the mailbox. This prominent location calls for something more than the $12.95 mailbox at the local hardware store. We also get quite a bit of mail because Kevin’s business mail is delivered to our home. We need to have an oversized box that looks good.

There are a number of places on the web that have links to well-designed, modern mailboxes. Apartment Therapy has their Top Ten Mailbox list with some great options. Chaisso http://www.chiasso.com/ has a number of inexpensive models and a search of mailboxes on Live Modern http://livemodern.com/ turns up a number of good options and resources.
We ended up selecting this Blomus model and ordering it from Amazon.com. It has a small window so that you can see when the mail has come and a matching newspaper slot can be added on the bottom. It costs a bit more than some of the other models we were looking at- but I think the quality will be very good and it’s a bit oversized to accommodate the extra mail. Blomus is a German company that specializes in stainless steel products that have a simple, modern design. A German mailbox for EcoDEEP haus makes perfect sense!

Door Bell
There are a number of well-designed modern options at Lumens.com http://www.lumens.com/lumens I picked the De-light Doorbell Button by Spore. This model has a LED light (I picked blue) and a couple of options for the surround (I picked polished aluminum). I was a bit disappointed when I received the doorbells, as the polished aluminum finish made the unit seem a bit cheap. In hindsight, I should have selected the matte finish. For the door bell chime, I went with this Cage Door Chime by Modern Doorbells also from Lumens.com. It has a 2-chime ring for the front door and 1-chime ring for the backdoor. Genius!

Saturday, April 26, 2008

Flooring and FLOR

Remodeling of an existing home means there is going to be some mixing and matching and patching. This certainly holds true for the flooring in our project. The majority of the house will have hard surface flooring. The main floor will be refinished hardwood flooring with existing oak hardwood used in the entry, pantry, and new FSC certified oak hardwood at the kitchen. The mudroom has existing maple floors and Kevin’s office has existing fir floors. The dining and living room will be new polished and sealed concrete.

The upper floor is a bit of a challenge, as the existing walls are all gone and none of the new spaces align well with the previous flooring outlines and uses. This meant that spaces like the bedrooms and corridor have only partial existing oak hardwood. We decided to consolidate the existing oak hardwood by salvaging it and using the hardwood flooring from the kids’ bedrooms to piece in and complete the flooring in the corridor. We were told it would be less expensive to just rip out all the wood and start over with new, than it would be to piece in existing wood. But we feel it’s important to reuse the wood from the existing floor, so we'll pay a little more to do so.
We decided to go with carpet in the 2 kid’s bedrooms, rather than hardwood or cork. The use of carpet is a hotly debated topic these days. There is the camp that says that carpet is a source of mold, dust mites, and other critters that are horrible for your health. The other side has evidence supported by the Carpet and Rug Institute (not exactly unbiased) that claim that carpet actually traps allergens that can be removed by vacuuming, thus increasing air quality. If someone in our family suffered from asthma, we might have a different opinion- but we don’t have a problem using a limited amount of carpet. Because we'd likely use area rugs in a hard-floored room anyway, we don’t think a fully carpeted room makes much difference when it comes to air quality.

FLOR is a modular carpet system made by Interface. The modular carpet system idea is certainly not new. As a child, I remember quite a few basements with carpet sample squares as the flooring in the rec rooms. FLOR carpet is that same concept, as it’s a do-it-yourself system that allows you to change and rearrange the tiles. I love the idea of being able to change out just one or 2 tiles if there is a stain, rather than recarpeting the whole room.

Interface is a very progressive carpet company that pledges to eliminate any negative impact they may have on the environment by 2020. They are leaders in industrial ecology, with the goal to be a restorative industry. They have continued to be very successful and are a great example of how a company can be sustainable and profitable at the same time.

FLOR comes in both residential and commericial grade. FLOR carpets for residential use come in a variety patterns, colors and prices. The tiles are 19.7” x 19.7” and range in price from about $7/tile to $25/tile. There are loads of styles from which to choose and I would highly suggest seeing actual samples before ordering, as the tiles range from soft/cushy to rather hard/scratchy. It’s impossible to tell from a picture in a catalog or on the web what exactly the carpet will feel like. The tiles have varying amounts of recycled content, wool, or corn- but all FLOR products meet the Carpet and Rug Institute’s (CRI) Green Label Plus standards for VOC (Volatile Organic Compound) emissions, are formaldehyde‐free and contain anti‐microbials that inhibit the growth of bacteria and mold.
This is Toy Poodle, color LaLa Lime. We will use this along with 3 other colors in Mazzy's bedroom. She is excited about designing the pattern.

FLOR is also completely recyclable. You can just call up Interface and they will arrange to pay for shipping costs to send the FLOR tiles back to them at the end of their useful life.

The FLOR website has a great tool to design your own floor or rug. You define the size and then you can place the color/style tile as you wish. After you have designed the floor, it will give you a breakdown of the types and price. Only negative thing is that there is no way to save your pattern.
We will use Straight & Narrow tiles in 3 colors in the boys' room. Declan says he likes everything I design, so he trusts me to figure out the pattern. I think he's trying to score a few points with me......

We ordered our FLOR tiles from Natural Built Home. They offer 10% off and we were able to make the deadline to get free shipping (another 13% savings). This even beat the 20% trade discount that we could have gotten by buying directly from FLOR (available to design professionals only). Stay tuned to see if this product can actually install as easily as they say!

Monday, April 21, 2008

Outgrowing the DIY Phase in Life

We often get asked the question “Are you doing some of the construction work yourself? Fifteen years ago, the answer would have been “yes, of course!”. But somewhere between the 10 year attic project, living without doors on our closets for 7 years and a bathroom with only a toilet (no sink) for 2 years, we ran out of steam for do-it-yourself projects.


We've been enjoying our closet doors for a year now. I can't believe it took us 6 years.\


We also realized that these drawn-out projects that we attempted to complete on our own to save money, actually saved us very little at times. This could have been avoided by getting projects done in a timely fashion. For example- light fixtures we bought and didn’t install for 3 years were discontinued, so non functioning ballasts led to eventually having to purchase all new fixtures. Lessons learned the hard way.

A completed bathroom- just in time for selling the house.....

After 10 years of living in an 70% complete attic, we hired a contractor to finish it. Very well spent money in my opinion! Jeffrey Swainhart was the saviour for our attic. http://www.swainhart.com/

So this time around, we’re doing the drawings, selecting products and coordinating, but the bulk of the real work will be done by our contractor. We will take on only a few safe tasks, such as installing closet systems, some cabinetry, the FLOR carpet tiles, the green roof and likely some of the landscaping and fencing. Could we do more? Yes, probably, but managing time to do that on top of 60-80 hr work weeks and the busy schedules that come with young families make it less a reality than we would perhaps like. We will end up changing and adding or tweaking things over time, after we’ve had a chance to live in the space for a while and we’ll no doubt change our minds a few times about paint colors and the like. Hats off to those who put in sweat equity into their own projects, it’s very satisfying to do the work yourselves! For us, we will settle for the satisfaction of seeing our design completed by others! (Thank you, Michlitsch Brothers)

Thursday, April 17, 2008

Rocking, Taping and Sanding

. Looking up from the kitchen to the second floor "bridge".

This week and last has seen a dramatic change to the interior of our house. The gypsum board (aka sheetrock) has gone up and we now have defined rooms. Now that we are not able to see from space to space (at the upper floor) we are getting used to the final sizes of the rooms. Some of the bedrooms are quite small, but we’re reminding ourselves that that was intentional and kids don’t really need double beds anyway, right?
In Mazzy's bedroom, looking to her closet.
Gypsum board has been the industry standard for about 50 years. By 1955, an estimated 50 percent of new homes were built using gypsum wallboard; the other 50 percent with built with gypsum lath and plaster. Gypsum board, or drywall, is typically made with 100% recycled, unbleached paper facings that are bonded without adhesives onto a gypsum core. Though mined virgin gypsum is still widely used in gypsum board production, recycled and synthetic gypsum comprise an increasing portion of product manufacturing. Another potential issue with gypsum board is mold growth in conditions of high humidity and low air circulation.

There are some options to gypsum board are out there. Magnesium oxide board “MgO board” does not have the paper face, thus will not promote mold growth. It’s extremely hard, but can’t be easily scored and snapped like gypsum board. One MgO board is called “Dragonboard”. http://www.dragonboard.com/ They make the dramatic claim that “No energy is consumed in manufacturing DRAGONBOARD.” That statement is simply untrue. Everything takes energy to produce. The manufacturing process takes place at room temperature which is great, but exactly how they can get by without consuming energy? There are lights on in the building, machinery involved in the extractions, manufacture and shipping. Energy is used.

Green E-board http://www.greeneboard.com/ is another MgO board that is marketed by Southern Cross Technologies in Florida. Don’t be fooled by the USGBC’s logo on the front of the web page however. The USGBC doesn’t approve or certify products. It's unclear where the product is made, but it doesn't appear to be local to us.

Most of the MgO board comes from overseas (mainly Asia) at this point. Which translates into significant embodied energy in its production (coal burning energy sources) and transportation and does not benefit the local economy. If this were to change, with more plants available across the country, MgO board might become a more viable green alternative. As for now, it’s hard to compete with gypsum board that has manufacturing plants regionally.


We are using dens gold gypsum board (no paper - fiberglass faced) at all bathroom and potentially damp areas. (We’re using cement board behind tiled areas such as the tub and shower.) Everywhere else, we are using 5/8” FX (fire resistive) gypsum board on both walls and ceilings. Standard thickness is ½” (and sometimes even 3/8”) in residential construction but we went thicker for better stability. And yes, the extra 1/8” thickness means we’re using a bit more material resources than typical, but the gypsum board we’ve got from USG contains a minimum of 25-45% recycled content and it comes from a few miles away.


In kitchen with island kneewall to the left. Looking towards door to basement.
South and west windows in the kitchen.
Living rooms window on left with view to backyard. Opening to mudroom/back entry on right.

Monday, April 14, 2008

Finding Ways to Spend Money

Here is an ode to the vagaries of remodeling. Re-using existing structures is generally better for the environment than building something new (embodied energy). It also generally allows one to save money, as foundations, walls and finishes are already installed. However, working within an existing house can often be difficult - finding ways to snake piping, wiring, ductwork and the likes through walls, joists and other elements isn't always easy and often leads to solutions that wouldn't be required in new construction. Sometimes those solutions are brilliantly achieved, graceful things. Sometimes they're not. And sometimes, they cost more than you'd like - especially when they are unexpected. It's the opposite of finding a jam jar full of money hidden in the wall. (You know, that just doesn't happen often enough, does it?)

First of all, let me say this to all the Code Officials and Building Inspectors out there in the world. "I love you. I love you all". I do. I promise. The work you do is important and keeps the rest of us from doing stupid things to our houses - making sure that they are safe and well constructed. The construction industry would be a far sight poorer without your presence and conscientious work.

We had several inspections last week - one for general framing and construction, one for electrical, one for plumbing and one for insulation. As a result of our framing inspection, we need to replace the glass in two windows (one new, one existing) with tempered glass. Tempered glass is stronger than regular glass. The existing window is too close to the new door and so would be better if it were tempered glass - to keep it from shattering when our kids turn teenagers and slam the door on their way out of the house after an argument about the clothes they're wearing (the code isn't quite that descriptive). The new window needing replacing is a 2'x2' window about four and a half feet above the floor. It also happens to be above a bathtub. This is a bathtub only and not a shower. The code requires that any glazing less than 60" above the bottom of a tub be tempered glass. The idea (and it makes sense) is that it is possible that while one is having the odd shower, one might slip on the soap and careen into the glass, shattering it with one's elbow - necessitating a visit to the emergency room (37 stitches) in the middle of a blizzard - the tub filling up with ice and snow, the sub-zero temps funneling through the now open window causing the pipes to burst because one is in the emergency room rather than fixing the window. Later, you fall off the ladder fixing the same window - requiring another trip to the emergency room and a back brace. Sounds bad.


We didn't originally have a tub in that particular bathroom so there was no issue when we placed the window order. We later added the bathtub (no shower) and forgot to consider the code regarding glazing above tubs. Our fault. The fact that the tub is a tub and the window will be above our heads as we won't be standing while bathing does not matter. Tempered it is. It's our mistake and we'll pay the few hundred dollars it will take to order new sashes with tempered glass.


A view of some plumbing done right with the window in question in the background.
You can see the framing for the tub if you look hard enough.


Less enjoyable are the changes we needed to make to most of the existing plumbing in the house. The previous plumbing in the recently remodeled downstairs bath and the sump pump - did not meet code. (The 1 1/2" vent pipe wasn't a 2" vent pipe, the 3" soil stack wasn't a 4" pipe and the sump pump can't be connected to the waste lines inside the house) So, our plumber had to re-plumb the bath supply, shower pressure balancing valve, venting and connections to the sump pump. The existing water heater (installed just a few years ago) vents into an unlined chimney (apparently, venting hot combustion air from a water heater into a chimney is more of a fire hazard than burning wood in the fireplace) and so we need to either power vent to the exterior or replace it with a sealed combustion unit. We're looking at pricing now, and determining how best to coordinate this with our solar hot water storage tank, but we are considerably less happy spending this money - correcting deficiencies in the existing work. We'd rather spend it elsewhere, like furniture, window treatment or planting a money tree. Oh well.

Thursday, April 10, 2008

Lighting Selections

It is the 2nd week in April and winter is STILL rearing its ugly head. We were at the house meeting a reporter from the Pioneer Press when the winds started blowing and snow started falling. Now (11 pm), we're getting a weird combination of thunder, lightning, snow and sleet. Old Man Winter is like some tortured soul that won't be put to rest without a fight.

So, the word is getting out on EcoDEEP Haus. There was an article in the local newspaper, the Highland Villager a few weeks back. The green resource website JetsonGreen, http://www.jetsongreen.com/ recently featured the project and the St. Paul Pioneer Press will have an article in their April 21 issue. Also, look for us in Architecture MN magazine May issue.

As we were at the house on this gray, blizzardy April day (something is just wrong about the word blizzard and April in the same sentence), we noticed how light-filled this house is, even in these adverse conditions. Even when we’ve been at the house in the early evening, we’ve been amazed by how well-lit the spaces are. There is no lighting or power in place yet but soon they will begin fixture installation.


Picking out lighting fixtures can be a daunting task. The lighting budget can very quickly get out of control, as something like a dining room fixture can cost anywhere from $150 to thousands and more. (And it turns out we usually prefer the most expensive ones! Go figure.) We started out with a very modest lighting budget, so we’re doing the best we can with what we have. But it’s very difficult to judge quality from a small picture viewed on the web!

In addition to the budget constraint, the MN Green Star program we are following has some tough guidelines on lighting. They give credit for use of CFLs, halogens and LEDs. They also give points for “no recessed lights in insulated ceilings”. This requirement made lighting selections difficult for some spaces on the upper floor of the house- namely the bathrooms and hallways where you’d usually see recessed can fixtures.

We found this fixture, which is a halogen fixture by WAC, and used it in a variety of ways. It’s adjustable, comes in several colors of shades and can either be wall or ceiling mounted. We used it above the kitchen sink/counter along the exterior wall, in the upper floor corridor ceiling, on the walls of the “hole” (opening between 2nd and 1st floor) and at the bridge walkway ceiling. We were also going to use it above the bathtub- but Mr. Code Official said no to that. http://www.waclighting.com/USA/products/?categoryid=218&productid=950

This fixture will be used in the bathroom ceilings as general illumination. There’s a fine line between too fussy and clean/modern fixtures. We’re hoping this one will pass muster when we see it in real life.

http://www.formplusfunction.com/12333.htm


This is what we selected for the bathroom vanities. It’s a halogen display light with an adjustable arm. We have one of these in our attic space and love the clean, industrial look of it. The bathroom vanity light might be the most difficult light fixture to select. Most of the options available are way too fussy and ornamental for us.
http://www.techlighting.com/default.asp?page=products&subpage=systemselect&sysid=7


This simple George Kovacs ceiling fixture will be used for all the bedroom ceilings. In this case (and many other fixtures in the house), we order them with standard lamping, but will use CFLs.
http://www.allmodernlighting.com/George-Kovacs-by-Minka-P852-044-gkv1442.html


This is another George Kovacs fixture for use over the dining room table. This one will set you back about $200.
http://www.allmodernlighting.com/asp/print_detail.asp?sku=gkv1368


This is the pendant by Vado for the Kitchen countertop. Simple and won’t compete with out Apple Martini Countertop!
http://www.lightinguniverse.com/products/view.aspx?sku=771845&linkLoc=


This fixture is for the exterior overhead soffits at the front and back door. It’s a standard fixture that's been around for years.


You can get it at a number of places. Here is one:


http://www.lampclick.com/lighting/item/9103-20296/13/Access_Lighting_Nauticus_Contemporary_Outdoor_Bulkhead_Wall_Sconce.html

Sunday, April 6, 2008

Insulation - A Home's Long Underwear


Just as the weather is turning slightly warmer - we're able to insulate our house. This is a big deal -as strange as it may sound, it is one of the most important aspects of the house. A well insulated and well sealed house is far more energy efficient and comfortable than homes that are poorly insulated. Insulation remains a critically important component of any green building—whether residential or commercial. No matter the type of insulation used, if it is used appropriately, its environmental benefits over a building’s life will almost certainly far outweigh any negatives—and dwarf any environmental differences among the alternative materials.

Our insulation contractor - Homeco Insulation - was on site last week preparing for and then installing the insulation in the walls, roof decks, rim joists and attic spaces.

We've used a few different approaches to insulation in this house. The common denominator being spray foam insulation. This insulation type is an expanding insulation that seals gaps, cracks and joints within the cavity it's filling, hardens into a strong shell and acts as its own vapor barrier. It carries a true R Value of R6 per inch and so we're able to achieve a wall system of R28 (closer to R30 if we count sheathing and air films, etc) in our walls. The walls will actually perform at that level too - unlike many fiberglass insulation installs that perform well below their label of R19. In order to combat the effect of potential thermal bridging through the studs -we used the dri-side clip system and air space behind our siding (R2). Another way to do this would be to install rigid insulation sheathing (or to have used structural insulated panels) but our builder wasn't comfortable with that approach - given that the hardie plank siding is heavy and he worried about screw length and weight and the ravages of time.

In the new walls (and accessible existing walls), we used a closed cell spray foam insulation at all wall cavities and rim joists (read more about the differing types of insulation down below) and in the existing walls we cored from the exterior, filled the cavities with dense pack cellulose and used a bio-based expanding foam to plug the holes.


A view of the insulation in the walls and roof deck. Note the yellow post it note I've left the insulators where I think the fill is a bit too shallow. Just like proofreading a document, you need to walk back through an installation after it's complete to make sure everything is filled just so because the foam expands during installation and takes a bit of time to cure.


On the roof decks and ceiling - we had originally planned to use 8" of spray foam at the bottom of the roof deck to get an R50+ rating (the higher the R value the better). However, we needed to trim a little $$ from our budget and so worked with Homeco Insulators to come up with a sensible alternative without compromising quality or performance. Because our roof trusses are 14" deep, and have no light fixtures in our insulated ceilings, we had plenty of space to fill. We used 2" of spray foam against the roof deck and then did a "net and blow" installation of 12" of dense fiberglass fill (virgin wool - Insulsafe SP) with a poly sheet vapor barrier.There is also varying thicknesses of rigid insulation on top of the roof deck (and below the fully adhered roof membrane) to help direct water flow to the roof drains. The combination of these systems produces an R value of R50+ in the roof at less cost. At soffit areas and overhangs, we sprayed 10" of spray foam for and R60 rating. Working with our insulators from start to finish was great - they offered the best solutions for the challenges of this house and did a top-notch job. The 3rd party energy modeler and testing agent for the Greenstar and Energy Star program gave the installation an "A".


A look at the "net and blow" fiberglass installation below the roof decks. Note how all seams and penetrations (electrical boxes and bathroom fans) are taped and sealed. The fiberglass will be pushed up against the spray foam above by the gypboard at the ceilings.


In the attic space below the existing gable roof, we added vents, air chutes and enough of the same fiberglass insulation used elsewhere to achieve R50+.

On our foundation walls and under the new slabs, we used several inches of rigid, high r value XPS insulation to keep heat from migrating to the earth through our floors. This helps keep our feet warmer in the winter.

Not bored yet? Here are some brief summary notes about some of the different types of insulation available today. [Source - Environmental Building Newsletter V14.1]

To really understand insulation materials kind and gentle reader, you have to understand the basics of heat flow. As you will no doubt remember from your high school physics class, there are three primary mechanisms of heat flow: conduction, convection, and radiation. Conduction is the movement of heat from direct contact, usually through solid matter—the handle of a hot frying pan conducting its heat to your hand, for example—but thermal conduction also occurs with liquids and gases (think boiling water or oil splattering on your hands at the stovetop).
Convection is the transfer of heat in liquids and gases by the movement of those molecules from one place to another. As air is warmed, it expands, becomes more buoyant, and rises—a process called natural convection. Forced convection is the distribution of warm air by use of a fan or air handler.
Finally, radiation is the transfer of heat from one body to another via the propagation of electromagnetic waves. Heat moves from warmth to cold. When you sit in front of a fireplace and look into the fire, your face is warmed by the radiant transfer of energy from that heat source to your face. That radiant energy is not affected by air currents - you can still get sunburned on the beach even when there is a breeze. Most insulation materials function by slowing the conductive flow of heat. Materials with low thermal conductivity more effectively block heat flow than materials with high thermal conductivity. The R-value of an insulation material measures its resistance to heat flow.

Note that air leakage is a type of convection. Air leakage allows conditioned air to leak out of a building and unconditioned air to leak in—bypassing the insulated portions of the envelope. In older homes air leakage around windows, through poorly fitting doors, and across poorly detailed walls can sometimes account for over half of the total wintertime heat loss! Air leakage can also occur through an insulation material, which can reduce that material’s effective R-value. Loose-fill fiberglass, for example, usually allows more airflow than does cellulose insulation.

Fiberglass: The most prevalent type of insulation in North America, fiberglass is produced from silica sand with various additives, including boron. Most fiberglass also contains a fairly high percentage of recycled glass. Scratchy and almost never installed correctly, fiberglass batt insulation for wall cavities is pretty low on my list of acceptable insulation products. The dense pack fiberglass fill is much better- especially when cavities can be sealed in another way- either by caulking or spray foaming.

Cellulose: Offering better R Values than fiberglass and without the scratchiness, Cellulose insulation is made primarily from post-consumer recycled newspaper, with up to 20% ammonium sulfate and/or borate flame retardants.

Mineral Wool: For cavity-fill and attic applications, rock wool and slag wool are similar to fiberglass in look and feel, though the density is greater and the sound control better. The fire resistance of mineral wool is also significantly better than that of fiberglass, because of both the higher density and the significantly higher temperatures required for melting. Mineral wool can also come in the form of rigid board insulation - especially useful for below grade installations.

Cotton Insulation. Cotton insulation is batt insulation made from pre-consumer recycled denim scrap. The cotton or cotton-polyester fibers are treated with a nonhalogenated flame retardant. The big plus here is that it is of high recycled content and doesn't scratch your lungs eyes or skin when installing it. It feels like your favorite old pair of jeans.


Spray Foam Insulation:

Closed-cell polyurethane - Closed-cell, high-density polyurethane is a very good performer owing to the low-conductivity gas in the cellular structure. It is used both for cavity installation and as an insulating roofing material, which is typically referred to as spray polyurethane foam or SPF. The closed-cell structure gives SPF structural properties. There should be no significant impact on R-value with the shift to non-ozone-depleting HFC-245fa blowing agent (ozone depletion potential = zero) , which is becoming the industry standard. Polyurethane also exhibits superb adhesive properties and good compressive strength.

Open-cell polyurethane. Open-cell polyurethane is most commonly installed into open cavities, though formulations are available for filling closed cavities from holes at the top. This is a nonstructural foam, though these materials seal very well, and their flexibility allows for some movement of the framing materials as shrinkage and expansion occur. These properties make them very effective insulation materials for older buildings. Some open cell polyurethanes are made from bio-based materials such as soy beans. Think of fluffy tofu.

Both closed-cell and open-cell polyurethane must be installed by trained professionals. Special care is required to ensure the safety of insulation installers working with these materials; other people should not be in the space while polyurethane insulation is being installed. Once cured, polyurethane insulation is considered by most IAQ experts to be quite inert. Closed cell offers better R values than does open cell.

Okay?

Metal Walls


This has been another big week for work at the HAUS. All trades completed their rough-ins, had their inspections and insulation was installed in the wall and roof cavities. Look for another post mid-week on Insulation and Plumbing Inspections. There are some good stories to tell there.

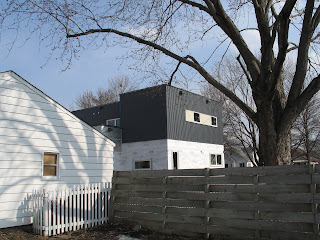
The house is beginning to look more like itself with each passing week. We're excited to see the metal wall panel installation beginning to occur around the West and North sides of the house. The crew is doing a nice job keeping panels in alignment, fasteners equally spaced and aligned and trim and drip caps at corners and windows water tight and sealed. The metal you see installed is a 7/8" corrugated metal panel from Metal Sales (local to Minnesota but with mills and manufacturing sites elsewhere in the U.S.). This metal panel is typically used in agricultural structures (pole barns, sheds. etc.) but we like the texture and the price! The panel comes in 34" wide sheets cut to length, is fastened through the ribs with pan head fasteners and self-sealing neoprene washers and comes complete with foam closures at top and bottom along with trim and drip edges to manage water and keep out insects and the like. It also has a 45 year warranty on the paint finish (charcoal gray). Some colors meet Energy Star and Cool Roof Council Rating criteria which were not a strong consideration in this application as we are using it on the walls.


View of the Northwest corner of the house. We plan on replacing the garage in the foreground in a couple of years.


A look at the ribbing, corner trim, metal drip edge and fastener spacing.


A good shot of how our windows are detailed. We used a narrowline brickmold at all windows. The drip cap and sill at top and bottom give a nice long shadow line across the elevation and keeps the opening simple and clean. The light gray material on either side of the window is Hardie Panel - a durable fiber cement board product we're using selectively around the house.
It will be painted some bright color - yet to be determined. I'm sure we'll change our minds several times before deciding.


The first bit of our composite wood decking found it's way onto the site late this week. We're using this at both entry stairs and the balcony off the guest room. We like composite wood decking because of its durability, low maintenance, color fastness and high recycled content (made from recycled wood fiber and plastic that would otherwise end up in landfills). There are many composite woods available on the market today - but we chose Trex (brasilia cayenne) - it's rich color will be a nice match for the Ipe/Ironwood exterior sunshades/trellises we're using above the windows on the south side of the house. Trex won't splinter or crack in the hot summers and cold winters, doesn't need sanding, staining or sealing and can be cut and installed just like wood.


A view of the decking at our small balcony.