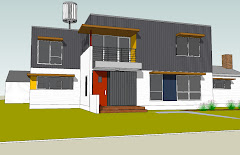
The work on the exterior siding is progressing nicely this week. It's rewarding to see it all coming together and so far, we're happy with the results. During the design, we debated long and hard on the exterior material palette. Our criteria was pretty simple:
- We knew that we wanted durable materials that would be as low maintenance as possible.
- We wanted a clean and simple esthetic.
- We were concerned about proportions and minimizing height.
Early on, we decided to go with a corrugated metal panel and some sort of cement board. Cement board can come in a variety of forms such as flat panels (4’x8’ sheets and larger), shingle style and lap siding in various thicknesses.
HardieBoard is one common manufacturer of cement board products.

There are many sustainable advantages to cement board siding. Cement board is composed of natural materials- wood pulp, cement, sand and water. There are multiple manufacturing plants throughout the country, so it will likely be produced regionally. It’s a very durable material with a 50-year warranty. Cement board resists damage from insects and flame spread. You can get the product in a pre-finished baked-on paint (limited colors) that has a 15-year warranty or you can paint it. Paint holds on to cement board much better than wood, so it means very little maintenance.
Like most products, along with all the good points, there are a few drawbacks. Cement board is very dense and quite hard to cut. Manufacturers will have cutting recommendations, as the dust produced by cutting cement board contains silica. All silica-containing products can produce small, respirable size particles when cut, drilled, ground, sanded, or otherwise abraded. Inhaling excessive quantities of respirable silca dust can cause silicosis (lung scarring) and other serious lung-related diseases. In other words, you need to make sure you’re protecting your lungs when cutting this stuff.
Although we liked the look of the flat cement board panels, with open joints or with reveals, we were a little nervous about this system in that it is so dependent on properly detailing the rainscreen system. Although it can look great, the panels don’t always lie flat and if not properly detailed or installed, it would not hold up over the years. Durability was a major requirement for us, so we decided to go with the cement board lap siding. This is a simple, proven system and requires no special detailing. Visually, it will provide us with the horizontal lines we wanted and recalls the vernacular style of the existing house.
We also debated quite some time over whether to put the metal siding at the base and the lap siding above or vise versa. In addition to the esthetics, we decided to put the lap siding at the base, so when we need to paint it in the future, it will be easy. (Important criteria for Kevin, who has had a bad ladder experience that resulted in a back brace for 6 months a few years back!).

We are using Hardie Panel at accent areas and between some of the windows on the upper floor. This helps to visually make the window openings appear larger, to unify the openings in the façade and to break up the scale of the metal.

The HardieBoard lap siding is used in two manners – although they will each look the same. On the new wall construction where we have spray foam insulation and high r-values, the lap siding is nailed up tight against the drainage plane and sheathing (Tyvek Drain Wrap) with flashing and caulking as needed. Just like any other well built wall. However, on the old walls where we used a blown in cellulose insulation, we used a building wrap/drainage plane with a reflective surface (Tyvek thermawrap). We then used a “dri-side” clip system that provides a 3/8” air space between the back of the siding and the drainage plane – this enables the siding to behave like a rain screen and the air space traps warmth –thereby improving the walls’ overall R-value. This additional R-value helps the existing walls with less insulating value behave more like the new walls with higher r-values and so balances out the performance of all the walls, making the house more consistent. This way, negative air pressure and temperature draw is not significantly pulled to the lower performing walls hastening temperature loss which helps improve energy efficiency as a result. That means lower utility bills. That means more beer and pizza for us. And tell me, who wouldn’t rather spend their money on beer and pizza instead of heating and cooling their home?


 We're excited to see the IPE sunshades. They are gorgeous and add warmth to the exterior.

 On Friday, the guys from CurbSide Landscape and Irrigation excavated the patio site. They laid down a root barrier sheet, then infilled with about 6" of crushed stone. They took a while to get this perfectly level using a surveyor's transit. Unfortunately, they were a bit short on the crushed stone, so they'll be back on Monday with the remainder.
 Kevin ponders just how much work this would have been to do by hand......
 We got a tip from the guys at CurbSide about setting the sand base. They suggested laying (2) 1" pipes down, infilling with sand, tamping it and then screeding it level using a 2x4. This technique worked pretty well and Kevin made a ton of progress on Saturday.
 A rubber mallet is used to tap the bricks into place in the sand. Kevin used a (mostly)half basketweave pattern. See if you can spot where the pattern goes awry in this photo! We're not too worried about the occassional quirkiness of the pattern. It's a character-builder.
 By Sunday, the entire family was helping (?) out.
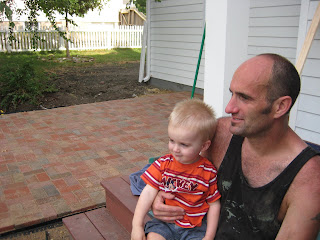 We should be complete with this project mid-week. After CurbSide delivers more crushed rock base, we'll be able to complete the patio area. CurbSide will then be working on the grading on the rest of the site, the installation of the rain garden and the hydro-seeding. Even though the seeding of the lawn won't provide a useable yard this year, at least we'll have a nice-looking patio from which to enjoy the outdoors.

.JPG)
 The casework by
  The
The  Toilet and tub are also from Toto. I can't wait to soak in this one!
  The tile is from
  Some more doug fir cabinets by
  We used the
  The countertops are made of
  This is the Ikea Pax closet system we used for our master bedroom closet.


.JPG)


 The recycled glass terrazzo countertop was installed, along with the Nexus vessel sink and faucet set.
 Here is a close-up of the glass terrazzo from
  Here's the first of 5 sliding doors to be installed. We used Leatherneck Flat Track hardware.
 The master bedroom floors are finished. We used 4x4 sheets of birch plywood, alternating the grain direction. We debated for quite awhile about which way to install this. The sheets can be biscuited together and act as a floating floor or secured down with screws or nails. We opted for nailing it down and filling in the nail holes with putty. The sheets were then finished with a sealer.

.JPG)


 Cormac checks out the drawers in the newly lit kitchen. The glass shades at the island are on backorder, so we'll be looking at bare bulbs for awhile.